
Your tools.
Connected, step by step.
Find your tool. Follow the exact Settings fields. Check the connection before asking Eydra to make changes.
For Eydra 0.6.14. Compatibility depends on your server, account and version.
Your MCP setup, in one download.
Get 32 editable JSON templates across Windows, macOS and Linux, plus an offline setup guide. Choose the connectors you need, replace the example paths and add them in Settings.
Templates and instructions only. No keys, installers or automatic changes. All JSON entries start disabled. Eydra supports up to eight connector entries at a time; the kit includes alternatives to choose from.
Where to save the files and how to use them
1. Extract the downloaded kit
Save it in a folder you control, such as Documents/Eydra-MCP-Kit. Open START-HERE.md, then choose windows/, macos/ or linux/. Each JSON is a fragment for one connector. Eydra does not automatically scan this folder or import ZIP files.
2. Add the values in Settings
Go to Settings → Knowledge → Connected tools. Copy id into Connector id. For a local server, choose Local executable, put command into Connector executable and only the args array into Local connector arguments. For HTTP, choose Remote HTTP and copy url into MCP endpoint URL. Use timeoutSeconds for the timeout.
Replace every placeholder with a real absolute path and install the matching server first. Add connector enables the entry immediately. HTTP tokens go in the saved row’s Bearer token (optional) → Save token field, not in a JSON file. See the actual Settings screenshots ↓
3. For manual JSON configuration
Run Eydra once, finish any active task and fully Quit Eydra from its tray or menu. Back up its existing settings.json, then merge only your chosen objects into its top-level connectors array. Preserve all other settings and avoid duplicate ids. Do not replace the entire file with a downloaded fragment.
- Windows · live settings
%APPDATA%\dev.eydra.desktop\settings.jsonPaste
%APPDATA%\dev.eydra.desktopinto File Explorer. This is the Roaming folder.- macOS · live settings
~/Library/Application Support/dev.eydra.desktop/settings.jsonIn Finder, use Go → Go to Folder to open the parent folder.
- Linux · live settings
~/.config/dev.eydra.desktop/settings.jsonIf
XDG_CONFIG_HOMEis set to an absolute directory, use$XDG_CONFIG_HOME/dev.eydra.desktop/settings.jsoninstead.
Keep enabled: false while preparing. After checking the executable, arguments and server, set it to true or enable the entry in Settings. Save valid UTF-8 JSON, restart Eydra and check each connection in a new task. Paths inside JSON must be absolute; ~ and environment variables are not expanded.
The kit’s FILE-LOCATIONS.md repeats these paths. CONNECTOR-GUIDE.md covers each server and a read-only check. LIMITATIONS.md explains Figma remote, Notion, Slack and Supabase, whose complete setup is not supported by Eydra 0.6.1. Native Linux templates omit Figma desktop and Fusion.
Where MCP connections live.
Open the gear in Eydra, or press Ctrl + , on Windows/Linux or ⌘ + , on macOS. Choose Knowledge in the sidebar, then scroll to Connected tools → MCP connector.
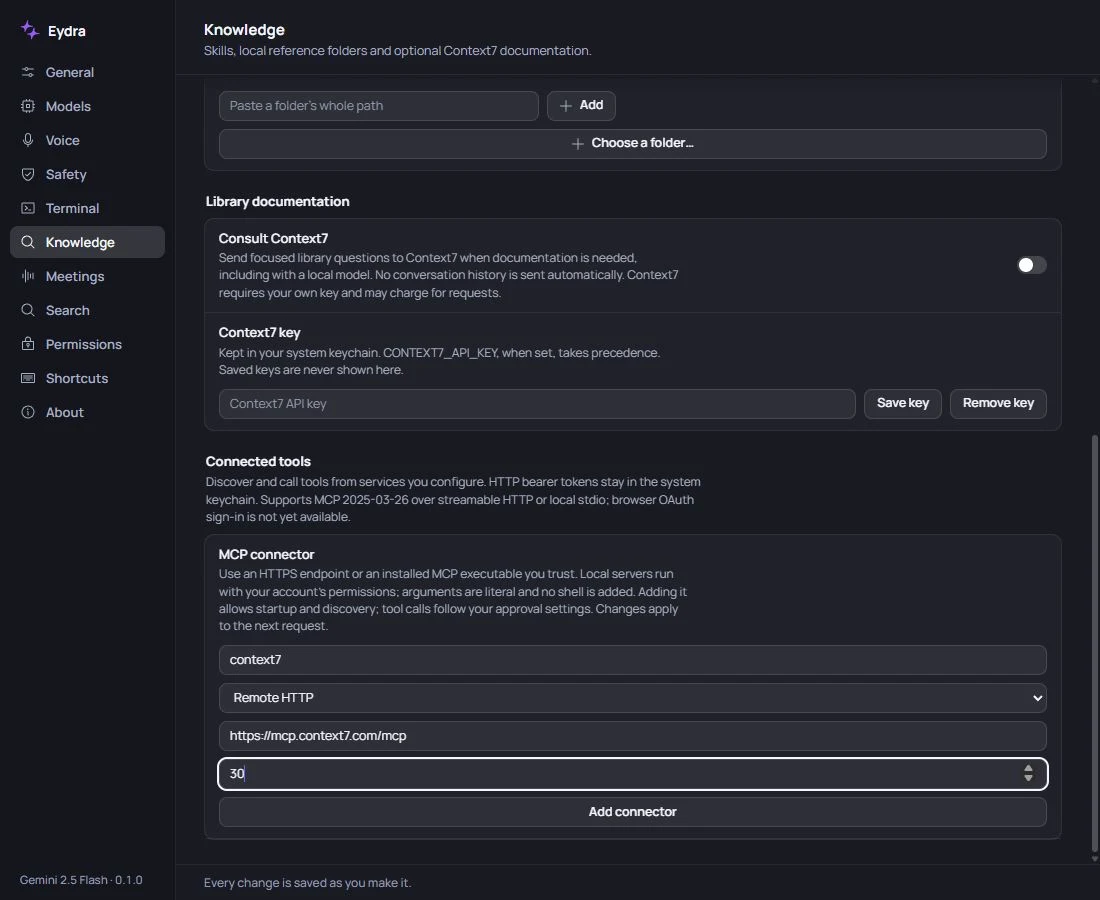
- Connector id: choose a unique name such as
blender. Use letters, digits, hyphens or underscores; maximum 64 characters. - Connector transport: choose Local executable for a stdio server launched on your computer, or Remote HTTP for a Streamable HTTP MCP endpoint.
- Endpoint or executable: HTTP takes a complete URL; local takes an absolute executable path. Do not paste a terminal command into the path field.
- Arguments: for local servers, enter a JSON array of strings. It is not a full
mcpServersconfiguration. Arguments are literal: shell variables,~and shell commands are not expanded. - Timeout: seconds from 1 to 600. Click Add connector. It is enabled immediately; changes apply to your next request.
Eydra supports up to sixteen connectors. HTTPS is required remotely; plain HTTP is allowed only on loopback. URLs cannot contain credentials, query parameters or fragments. The current UI does not support custom headers, an environment-variable editor or browser OAuth.
Where to put an HTTP token
After adding the connector, find its new row below the form. Enter only the token in Bearer token (optional) and click Save token. Eydra adds the Authorization header and keeps the secret in the OS keychain. Token controls are disabled for local executables.
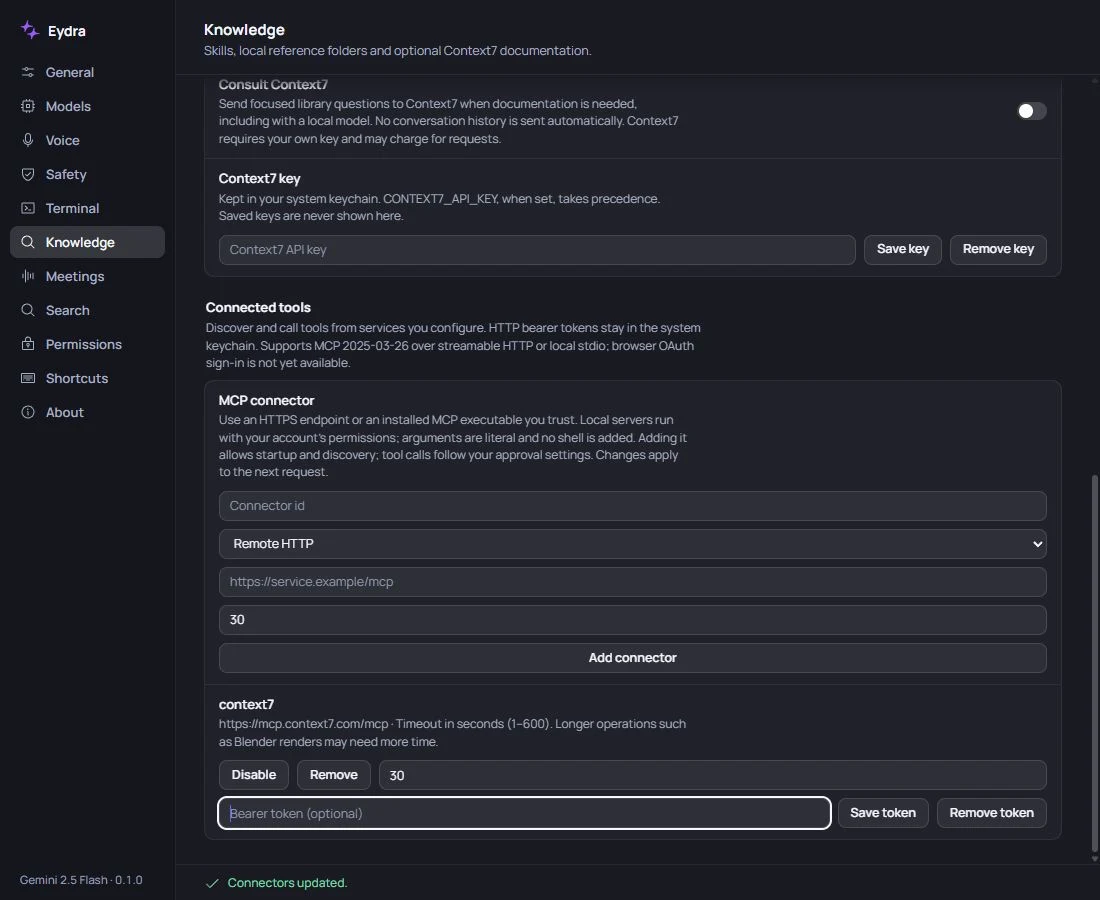
Adding a local connector authorizes startup and tool discovery. Its code runs with your account’s access. Tool calls follow your approval settings. This page only explains configuration; it does not connect your apps or receive your keys.
Connect your signed-in browser.
The browser companion uses your existing Chrome, Edge or Brave profile on Windows, macOS and Linux. Install the matching desktop release first; no Node.js runtime is needed for this connection.
- Open Eydra’s Settings → Connected tools, choose Chrome and save the prepared connection.
- Choose Open extension folder to locate the bundled extension. In your browser’s Extensions page, enable Developer mode, choose Load unpacked and select that folder.
- Open the Eydra extension. Choose Connect browser for HTTP/HTTPS tabs in this profile, or Connect only this tab for narrower access. Accept the browser’s requested site access.
- Return to Eydra and use Check. Keep the browser running while Eydra works.
Eydra can find tabs, open grouped task tabs, inspect page content and CSS, and perform guarded page actions. For Gmail, it captures the newest message in each requested inbox thread and reuses captured text for long-body continuations. It reports missing or clipped bodies and does not inspect attachments automatically.
The Chrome Web Store entry is registered. Store distribution requires Google’s review; until the listing is available, install this preview unpacked. Use Eydra desktop 0.6.11 or later for compatibility with the store extension. Connect each intended browser profile separately. Firefox and Safari do not use this extension. Desktop actions on Linux require X11; the browser companion operates through Chromium’s extension APIs.
“Use the connected browser to summarize the five newest inbox threads in Gmail. Include sender, date, key facts and any deadlines. Tell me if a body is incomplete.”
Connect Blender.
First identify your add-on. Blender Lab MCP and the community MCP for Blender are different servers with different protocols. Their launch commands are not interchangeable.
Blender Lab MCP · the integration used in our recorded test
If you installed Blender Lab’s MCP project, enable its matching add-on in Blender. Use its installed local server, not the similarly named package from another project. For a checkout at C:/blender_mcp, configure Settings → Knowledge → Connected tools as follows:
- Connector id
blender- Connector transport
Local executable- Connector executable
Absolute path to uv / uv.exe (not uvx)- Local connector arguments (JSON array)
["--directory","C:/blender_mcp/mcp","run","--offline","blender-mcp"]- Connector timeout in seconds
60
Find uv with (Get-Command uv.exe).Source on Windows or command -v uv on macOS/Linux. Replace the checkout path with your own. The project and its dependencies must already be installed for --offline. Keep Blender open with the add-on’s server running. No bearer token is needed. A useful first request is: “Discover blender tools and call get_objects_summary without changing the scene.”
Community MCP for Blender · a separate add-on
First install Blender, uv, and the community MCP for Blender add-on and server. Follow that project’s manual installation steps. In Blender, enable the add-on, open the viewport sidebar with N, and check its MCP server is running. Keep Blender open.
In Settings → Knowledge → Connected tools, enter:
- Connector id
blender- Connector transport
Local executable- Connector executable
The absolute path returned by the lookup below- Local connector arguments (JSON array)
["mcp-for-blender"]- Connector timeout in seconds
120
Locate uvx on your own machine, then paste the returned absolute path into Connector executable:
(Get-Command uvx.exe).Sourcecommand -v uvxFor example, a Windows path ends in uvx.exe; macOS/Linux uses the path to uvx. The example path in the screenshot is illustrative. Do not copy it unless it exists on your machine. Windows local connectors must be .exe files, not npx.cmd, batch files or PowerShell command strings.
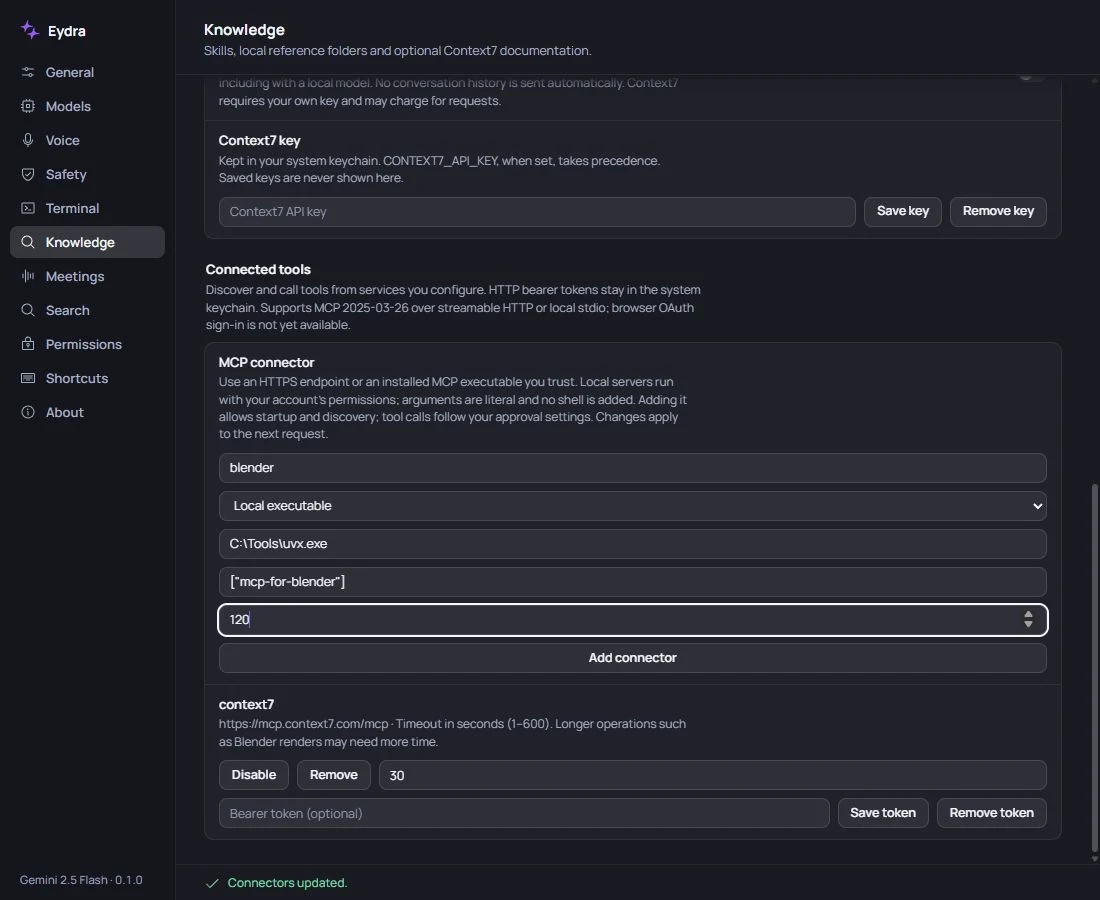
Click Add connector. The server launcher may download its package on first use, so install and review it beforehand. This community project previously used the package name blender-mcp; that name alone does not identify which add-on you installed. The Blender add-on’s socket (commonly port 9876) is not an HTTP MCP URL.
“Discover the tools on the blender connector and inspect the current scene. Tell me the object names without changing anything.”
Once inspection works, attach your reference and specify the scene, dimensions and output file you want. For a live scene use the connector; background Blender scripts are a separate workflow.
Connect Autodesk Fusion.
On a machine running Fusion, install the community faust-machines Fusion360 MCP server and add-in. Its two components are both required. In Fusion, use Shift+S → Add-Ins → Fusion360MCP → Run, and keep a design open. Check the listening port in its log.
For the upstream configuration on port 9876, enter these values in Settings → Knowledge → Connected tools. Locate your uvx path using the lookup commands above.
- Connector id
fusion360- Connector transport
Local executable- Connector executable
The absolute path to your installed uvx executable- Local connector arguments (JSON array)
["fusion360-mcp-server","--mode","socket","--host","127.0.0.1","--port","9876"]- Connector timeout in seconds
60
Click Add connector. No bearer token is needed for this local stdio connection. The TCP bridge between the server and Fusion is not an HTTP endpoint.
Already using Eydra’s reviewed Windows setup on port 9877?
That setup uses its installed virtual-environment Python executable, not uvx. Keep the executable path written by the setup helper and use:
["-I","-m","fusion360_mcp","--mode","socket","--host","127.0.0.1","--port","9877"]Timeout: 60 seconds. Do not create a duplicate fusion360 entry if the helper already registered it. This helper is a developer setup, not a component silently installed by Eydra’s desktop installer.
If Blender already uses 9876, configure the Fusion add-in to use 9877 and match --port in the arguments. Changing only Eydra’s arguments does not change the add-in’s port. Keep the bridge on 127.0.0.1; do not expose its unauthenticated socket publicly.
“Discover the fusion360 connector tools. Inspect the active design and list its bodies and units without making changes.”
Then attach a blueprint and state real units, dimensions, tolerances and the desired F3D, STEP or STL outputs. Ask for measured verification. If a modification times out, inspect the design before retrying.
Give Eydra current documentation.
The integrated Context7 option
Go to Settings → Knowledge → Library documentation. Get your own key from the Context7 dashboard, paste it into Context7 API key, click Save key, and enable Consult Context7. In 0.6.1, new settings enable Consult Context7 by default, but a valid key is still required. Existing opt-outs are preserved. The status below the key field explains whether configuration is missing; it does not certify a successful connection. No MCP connector is required for this option. The controls are directly above Connected tools in the first screenshot.
Focused library questions are sent to Context7, including when your model is local. The key is stored in your OS keychain; an existing CONTEXT7_API_KEY environment setting takes precedence.
If you prefer the MCP connector
Use these values in Connected tools, then add your token in the saved connector row:
- Connector id
context7- Connector transport
Remote HTTP- MCP endpoint URL
https://mcp.context7.com/mcp- Connector timeout in seconds
30- Bearer token (optional), after Add connector
Your Context7 API key, without the Bearer prefix
This follows Context7’s bearer-authenticated MCP configuration. Choose one route to start; you do not need to configure both.
“Use Context7 to find the documentation for the version of Astro in this project. Cite the documentation you used.” For the MCP route, also name the context7 connector.
Connect Figma.
Desktop route: configuration available below; live compatibility must be checked on your machine. Remote route: not supported directly by Eydra 0.6.1.
Figma desktop · local design context
In the Figma desktop app, open a Design file, enter Dev Mode with Shift + D, and find MCP server → Enable desktop MCP server in the inspect panel. Keep Figma open. See Figma’s desktop instructions for account access and current requirements.
In Settings → Knowledge → Connected tools, add:
- Connector id
figma-desktop- Connector transport
Remote HTTP- MCP endpoint URL
http://127.0.0.1:3845/mcp- Connector timeout in seconds
30- Bearer token (optional), after Add connector
Leave empty
Despite the label “Remote HTTP”, this transport also accepts a local HTTP server. Do not use the older /sse URL. Select a frame in Figma or copy its frame link, including the node id.
“Discover figma-desktop tools and read the selected frame’s layout, typography and colors. Do not change the file.”
Figma remote · OAuth and client approval
The official endpoint is https://mcp.figma.com/mcp. Figma requires OAuth sign-in and currently restricts remote access to approved clients. Eydra has no MCP OAuth flow or confirmed Figma client approval in this release. Pasting a personal access token is not a substitute. Remote-only canvas creation tools should not be assumed to exist on the desktop server. See Figma’s remote requirements.
Connect GitHub.
Create a personal access token in GitHub’s Settings → Developer settings → Personal access tokens. Limit it to the repositories and permissions your task needs; organization approval or SSO authorization may also be required. Follow GitHub’s PAT setup instructions.
Start with the official server’s read-only endpoint. In Settings → Knowledge → Connected tools:
- Connector id
github- Connector transport
Remote HTTP- MCP endpoint URL
https://api.githubcopilot.com/mcp/readonly- Connector timeout in seconds
30- Bearer token (optional), after Add connector
Your GitHub PAT, without the Bearer prefix
Click Add connector, then enter the PAT in its saved row and click Save token. For an intentionally write-enabled connection, use https://api.githubcopilot.com/mcp/ with suitable token permissions. Eydra has no custom-header editor; use documented endpoint paths for read-only or toolset selection.
“Use the github connector to list open issues in OWNER/REPOSITORY. Do not comment, edit or create anything.” Replace the repository with one your token can access.
Connect Linear.
In Linear, create a restricted personal API key under Settings → Security & access → Personal API keys. If your workspace restricts keys, ask its administrator. Linear supports API keys in the bearer header, so this route does not require Eydra to open OAuth.
In Settings → Knowledge → Connected tools, enter:
- Connector id
linear- Connector transport
Remote HTTP- MCP endpoint URL
https://mcp.linear.app/mcp/readonly- Connector timeout in seconds
30- Bearer token (optional), after Add connector
Your restricted Linear API key, without the Bearer prefix
Add the connector, then Save token in its row. For authorized creation and editing, the standard endpoint is https://mcp.linear.app/mcp; its token must also allow those actions. Do not use the deprecated /sse endpoint.
“Use linear to list my assigned issues and summarize their status. Do not update anything.”
Connect Playwright.
Install Node.js and a browser supported by Microsoft’s Playwright MCP server. In your own terminal, start a dedicated local server and keep that terminal running:
npx -y @playwright/mcp@latest --host 127.0.0.1 --port 8931 --isolatedThis command downloads and runs the package. For repeatable use, review and pin a tested package version instead of @latest. In Settings → Knowledge → Connected tools:
- Connector id
playwright- Connector transport
Remote HTTP- MCP endpoint URL
http://127.0.0.1:8931/mcp- Connector timeout in seconds
60- Bearer token (optional), after Add connector
Leave empty
The isolated browser does not inherit your normal signed-in Chrome session. If the server reports a missing browser, follow its browser installation instructions. The HTTP launch works around Windows’ npx.cmd executable restriction in Eydra. Keep it bound to loopback.
“Use playwright to open https://example.com and report the page title. Do not sign in or submit forms.”
Connect a filesystem server.
Eydra already has file tools. Add the MCP filesystem reference server only when a workflow needs it. Install Node.js, create a dedicated folder for MCP packages, then run this command inside that folder:
npm install --save-exact @modelcontextprotocol/server-filesystemFind Node’s executable using (Get-Command node.exe).Source in PowerShell or command -v node on macOS/Linux. Use the actual absolute executable path. In Settings → Knowledge → Connected tools:
- Connector id
filesystem- Connector transport
Local executable- Connector executable
Absolute path to node / node.exe- Local connector arguments (JSON array)
["C:/MCP/node_modules/@modelcontextprotocol/server-filesystem/dist/index.js","C:/Projects/demo"]- Connector timeout in seconds
60
Replace both paths: the first is the installed server entry point; the second is an existing directory you authorize the server to read and write. For macOS/Linux, use their absolute paths, for example /Users/you/MCP/node_modules/@modelcontextprotocol/server-filesystem/dist/index.js and /Users/you/Projects/demo. Forward slashes keep Windows JSON valid; backslashes need escaping. No token is required.
Append another directory as another JSON string if needed. The server’s allowlist governs this connector, not every other tool in Eydra. Avoid granting your whole home directory.
“Ask filesystem for its allowed directories, then list the demo directory. Do not write files.”
Connect a local Git repository.
Install Git and uv. The Git reference server works on an existing local checkout. This is separate from GitHub’s hosted MCP. In Settings → Knowledge → Connected tools:
- Connector id
git- Connector transport
Local executable- Connector executable
Absolute path to uvx / uvx.exe- Local connector arguments (JSON array)
["mcp-server-git","--repository","C:/Projects/demo"]- Connector timeout in seconds
60
Replace the repository path with your actual checkout, using a full macOS/Linux path where applicable. Find uvx with the lookup shown in the Blender guide. No HTTP token is needed. The repository argument selects a working repository; do not treat it as an OS sandbox.
“Use git to show repository status and summarize the uncommitted diff. Do not stage, commit, reset or push.”
Connect Fetch.
Install uv, then use the Fetch reference server to retrieve web content. In Settings → Knowledge → Connected tools:
- Connector id
fetch- Connector transport
Local executable- Connector executable
Absolute path to uvx / uvx.exe- Local connector arguments (JSON array)
["mcp-server-fetch"]- Connector timeout in seconds
60
Use the absolute uvx path and leave token fields empty. Fetch retrieves pages; it is not a signed-in browser or a search engine. It can reach network resources accessible to the process. On Windows, if its documented encoding issue occurs, set PYTHONIOENCODING=utf-8 in the environment used to launch Eydra and restart it; this release has no per-connector environment editor.
“Use fetch to read https://example.com and summarize its public content.”
Notion, Slack and Supabase.
These services expose MCP, but their complete connection requirements do not fit Eydra 0.6.1’s Settings yet. The addresses below are technical references, not working one-click presets.
Notion · OAuth required
- Official endpoint
https://mcp.notion.com/mcp- Transport
Streamable HTTP- Authentication
Interactive OAuth; no Eydra MCP sign-in flow yet
Notion’s hosted MCP requires authorization of a workspace. A Notion integration secret is not a substitute for that OAuth flow. Use a supported client until Eydra implements it; do not copy browser session tokens into Settings.
Slack · registered app and workspace approval
- Official endpoint
https://mcp.slack.com/mcp- Transport
Streamable HTTP- Authentication
Registered Slack app, approved access and OAuth user credentials
Slack requires an eligible registered app identity and does not provide dynamic client registration. A random bot token or the URL alone is insufficient. Eydra has no built-in Slack MCP app authorization flow in this release.
Supabase · scoped connection needs query parameters
- Official scoped endpoint
https://mcp.supabase.com/mcp?project_ref=YOUR_PROJECT_REF&read_only=true- Authentication
Provider OAuth or a supported personal access token- Eydra limitation
Connector URLs currently reject query parameters
Get the project reference from Supabase → Project settings → General → Project ID. Supabase’s guide uses these parameters to restrict project access and enable read-only mode. Eydra cannot save this scoped URL yet. Do not remove its restrictions just to make the form accept it. Do not use an anon key or service-role database key as an MCP bearer token.
Choose the model that drives it.
Models are configured in Settings → Models, not Connected tools. A connected MCP server supplies tools; it does not select your model.
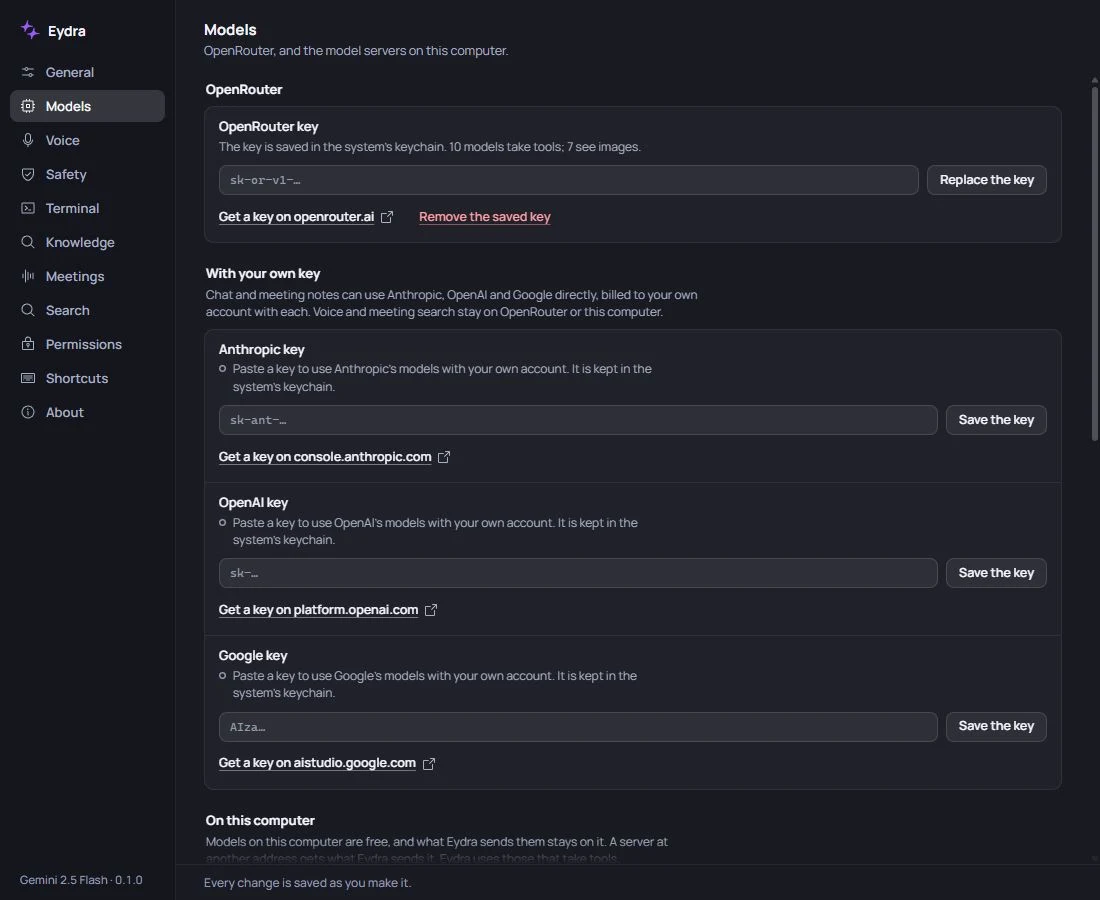
OpenRouter and direct providers
For OpenRouter, put your key in OpenRouter key and choose Save the key (or Replace the key if one is saved). Anthropic, OpenAI and Google have separate fields under With your own key. Pick an available tool-capable model in the model selector; image-based tasks also need image support.
Reasoning and visual feedback
In 0.6.1, Jev adapts Balanced for OpenRouter models. Quick and Thorough respect your explicit choice; Thorough requests high reasoning where supported. Astra Latest and Sol Latest OpenRouter aliases use your OpenRouter account. For image-based work, select a model that supports images: supported MCP screenshots and renders now reach its visual input. Results still need review against the reference.
Ollama, LM Studio and llama.cpp
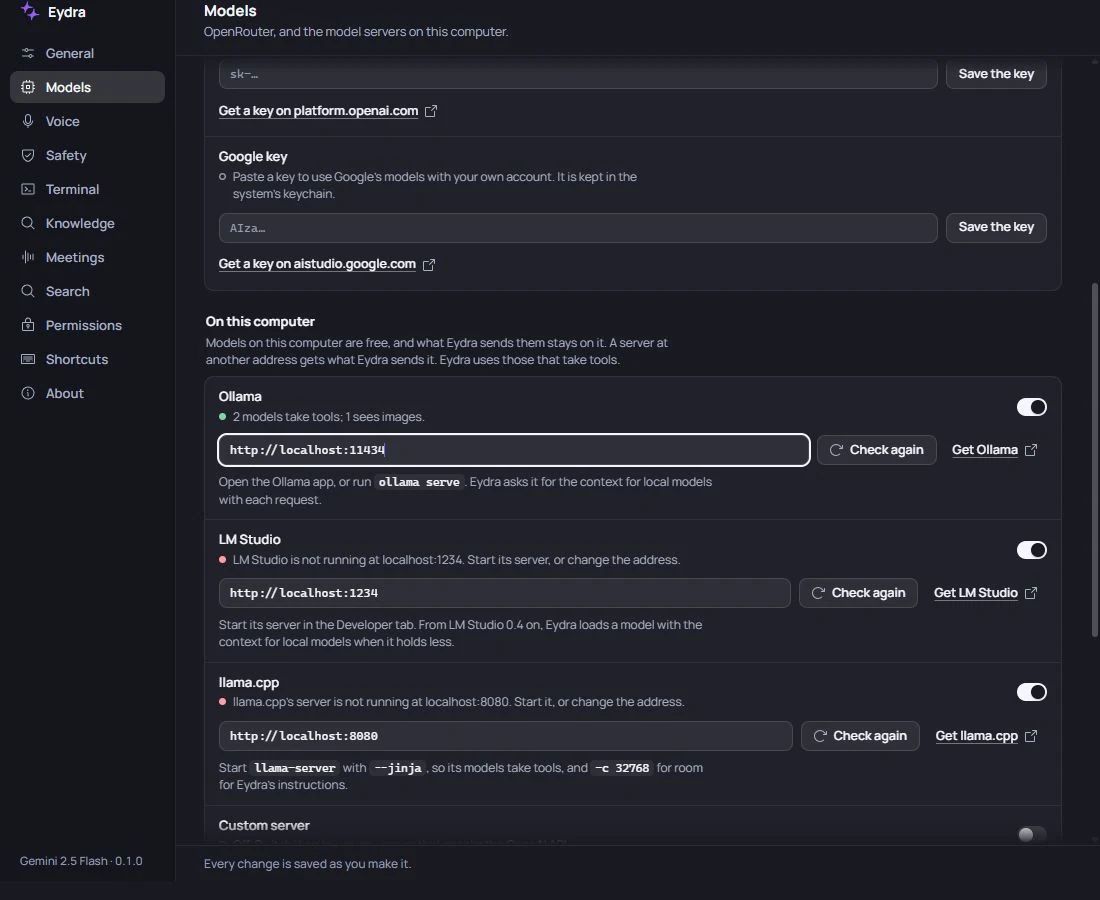
Start the model server and load or download a suitable model first. Under On this computer, enable its switch, enter its server address and click Check again.
- Ollama address
http://localhost:11434- LM Studio address
http://localhost:1234- llama.cpp address
http://localhost:8080
These are Eydra’s default addresses; use your server’s actual address if you changed it. Ollama can run with ollama serve. Start LM Studio’s server from its Developer tab. For llama.cpp, Eydra’s setup help calls for --jinja and enough context, such as -c 32768. Then select a returned model in Eydra. No MCP id, transport or token field is involved.
Show local model Settings
Python, Node, PowerShell and editors.
These use Eydra’s execution tools and do not need an MCP connector. Install the runtime or editor on your computer first. In Settings → Terminal, review the terminal controls and the folders under Where it works. Review approvals in Settings → Safety.
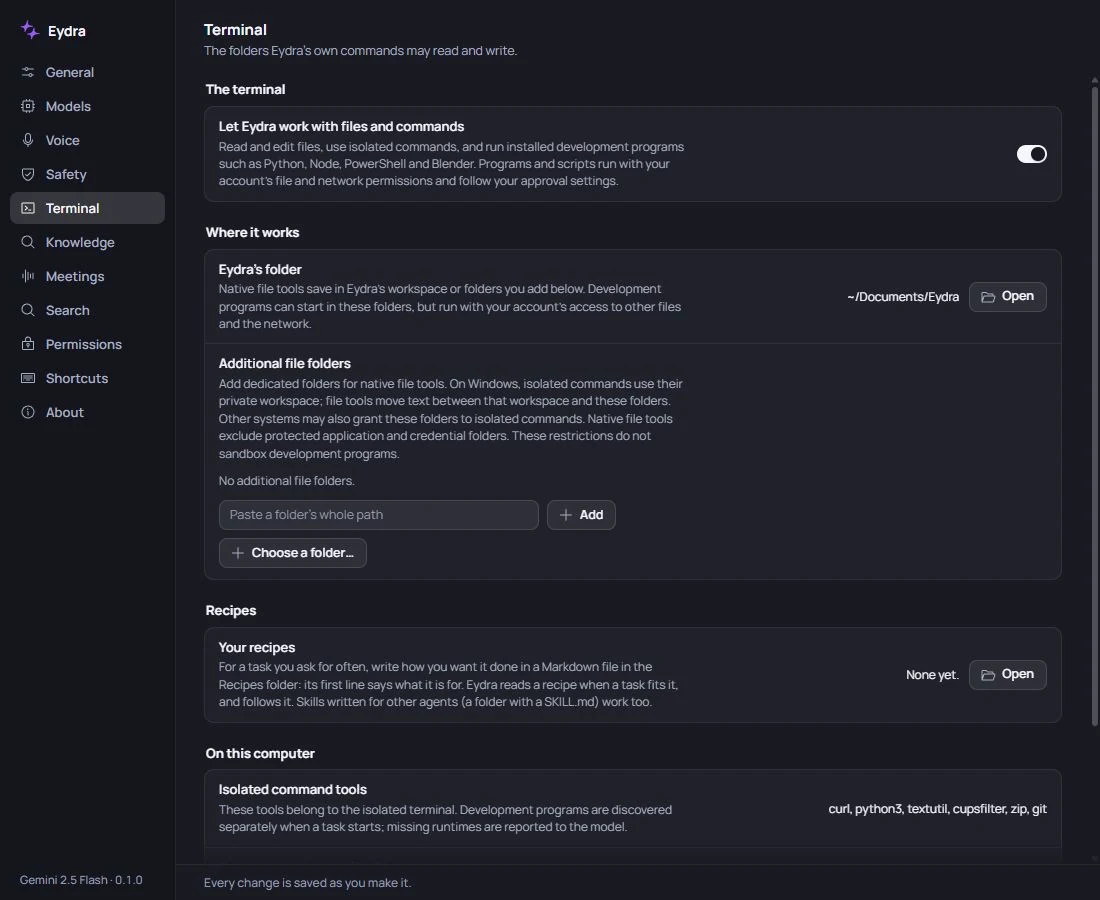
General program execution starts in an approved folder and runs with your account permissions; that folder is not a filesystem sandbox. For VS Code, install the editor and tell Eydra which project to open. Program discovery happens when a task starts.
“Check which Python and Node runtimes are installed and report their versions. Do not install anything or change files.”
Linux desktop access.
Linux support is an operating-system integration, not an MCP server. This release’s desktop actions require X11 and the accessibility bus. Open Settings → Permissions and follow the checks for your session. Install Python, Node or application connectors separately when your workflow needs them.
When a connection needs attention.
- Executable not found: locate it again and use an absolute path. Restart Eydra after changing your system environment. On Windows, choose an actual EXE.
- Invalid arguments: use a JSON array such as
["mcp-for-blender"], not a shell command or a JSON object. - No tools: check that the connector is enabled, start the target app/add-in, and send a new discovery request. Use Check on the saved connection. Discovery confirms that the server responds; verify its application bridge separately.
- 401 or 403: check the saved bearer token. Services requiring OAuth or custom authentication headers need a compatible configuration; those controls are not available here.
- Connection refused: check the add-in is running and both sides agree on the port. Avoid a Blender/Fusion port collision.
- Timeout: raise the connector timeout if appropriate, up to 600 seconds. Inspect the application before retrying a change that may already have completed.
- Connected but the task fails: confirm the selected model supports tools and, when needed, images. Tool availability does not guarantee modeling accuracy.